Tech Tip for blogger
Your www.<websitename>.com is working perfectly but without the 'www' it fails! Why? You need to 'forward' the domain.
1. Follow blogger instructions to setup your DNS CName settings with your domain supplier. Make sure its working with www.<websitename>.com (in Blogger and domain supplier)
2. Update your settings for 'forwarding' with domain supplier
3. Click the box next to Redirect <websitename>.com to www.<websitename>.com in Blogger
Took me a while to figure out why the website name without the www was not working. Seems like a simple solution!
Cheers,
Kiwi Dee
Showing posts with label Tech Ninja Tips. Show all posts
Showing posts with label Tech Ninja Tips. Show all posts
31 Dec 2014
9 Dec 2014
Turn off Automatic Mark as Unread in MS Outlook
If you are like me and skim read the messages in your Outlook first, then go back to action them then turning off the automatic 'mark as unread' is very useful.
See below for turning this function off in Microsoft Outlook 2010
1. Click View
2. Click Reading Pane
3. Click Options

3. Un-tick the 'Mark Item as read when selection changes'

4. Press OK and enjoy a more 'you' outlook!
Cheers,
KiwiDee
See below for turning this function off in Microsoft Outlook 2010
1. Click View
2. Click Reading Pane
3. Click Options
3. Un-tick the 'Mark Item as read when selection changes'
4. Press OK and enjoy a more 'you' outlook!
Cheers,
KiwiDee
7 Dec 2014
Easy Microsoft Project 2010 Tutorial
Watch the presentation below with easy context and YouTube videos embedded.
Note this is designed for students in a Project Management class so a few things may not make sense.
_________________________________________________________________________________
The embedded Youtube videos (3 parts) are in the Prezi above but these are the direct links:
Part 1 of 3 Microsoft Project Tutorial
How to get a kick start into using Microsoft Project 2010 - entering tasks, duration's and predecessors.
Part 2 of 3 MS Project 2010
Shows grouping tasks, fixing up the chart, adding resources, assigning resources and setting baseline.
Part 3 of 3 MS Project Tutorial
Includes Task Completion, how to implement changes and view the tracking Gantt Chart, view overall budget and time changes.
_________________________________________________________________________________
Background
This was created as part of my studies required me to put together a digital technology learning module and I chose MS Project 2010. It follows the 4 stages of Project Management - Initiation, Planning, Implementation and Closing. I tried not to make it boring and really informative !
Cheers,
KiwiDee
3 Dec 2014
How to Screenshot
Makes your life so much easier when you want to share something you find on your computer (and errors in software - really good to send to the IT crowd if you need serious help!).
Computer:
1. Ctrl, Alt, PrtSrn

2. Ctl C and Ctrl V into document or email
3. You can further crop the screen shot in Microsoft Word by clicking on the image and following the below:

1. Top tun off button and main home button at the same time

2. You will find the image under your Photos in the phone
3. Click the wee square with arrow in it (share button) if you want to email or message others about it.

Other
Install a screen capture tool on your device like
- Green Shot on PC
- Just take a picture of the computer screen with your camera! easy :) Although wont be very nice quality image
- http://lifehacker.com/5218155/five-best-screen-capture-tools
Cheerio!
KiwiDee
7 Oct 2014
Change Default Duration in MS Project
Easy to change the type of default duration in MS Project 2010
1. File, Options

2. Schedule
Click whatever you want from the drop down under Duration

3. Voila! Yus changed from days to weeks thank gawd

1. File, Options
2. Schedule
Click whatever you want from the drop down under Duration
3. Voila! Yus changed from days to weeks thank gawd
Cheers,
KiwiDee
3 Oct 2014
Insert tick on Google Docs
Instead of going through different tabs, properties and searching around Google Docs interface, just copy and paste the tick symbol below. Easy
DONE! ★
✓
✔
DONE! ★
26 Sept 2014
How To Add a Password On Excel Spreadsheet
Excel Tip
How To Add a Password On Microsoft Excel Workbook/Spreadsheet so others can't modify it but can read it. So peeps can't mess with your stuff! MY... PRECIOUS..
1. Have the spreadsheet open you want to put a password on.
2. Click File, Save as
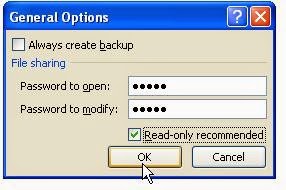
3. Click bottom left button 'General Options' in the Save as window

4. Type in your preferred password in both fields. Tick the box and press OK.
5. Press Save.
6. Cancel out of document and test your password
DONE BOOM!

Your Welcome,
KiwiDee
How To Add a Password On Microsoft Excel Workbook/Spreadsheet so others can't modify it but can read it. So peeps can't mess with your stuff! MY... PRECIOUS..
1. Have the spreadsheet open you want to put a password on.
2. Click File, Save as
3. Click bottom left button 'General Options' in the Save as window
4. Type in your preferred password in both fields. Tick the box and press OK.
5. Press Save.
6. Cancel out of document and test your password
DONE BOOM!
Your Welcome,
KiwiDee
25 Jun 2014
My App in the App Store
I set a goal for myself; To see if I could get an app to the iTunes Appstore by the end of 2013.
Well it happened! I will reveal all in this post. I paid next to nothing (although a lot in time), without in depth coding and all by myself. How? Well I will share with you my secrets!
Why?
Well why not!? I've always had a hankering to see if I could get an app to the app store, a bit of a personal challenge and a boasting point I suppose! "Why Yes, I do have an app in the app store and its not half bad :)."
What?
Since I had no skills coding and programming the amount of functions needed to be cut down. I quickly realized having a simple content based app was the way to go. With all my reading, many said to keep it simple as the user wasn't interested in trudging through all your 'cool' ideas and pages.
Having a look at my immediate whereabouts (Napier, New Zealand) I decided a info app on Art Deco and top things to do in Sunny Napier is a good start. I started 20 Buildings to write about/images. I soon cut this down to top 5 as it takes a LONG time to generate your own quality content. I added top 5 things to do in Napier and voila! I had a Top10 App.
How?
Elance? ODesk? TeaminIndia? Developer contacts? NO WAY (although I'd like to explore these options). I went down the DIY road. DYOR People!!! After a few stop starts, I settled on AppArchitect. It was basic as it was still in its beta phase. So I adapted my app to fit into what was available at the time on the web based platform builder. The first go at getting into the app store (Version 1) saw my half hearted effort get there... Yeah nah, didn't go well (a little embarrassed of it actually!) Also it was uploaded under the developer Applique - That's what AppArchitect was originally named. It had to be by default Free also.


After thinking - should I just leave it or spruce it up? After seeing they were going to release the actual binary code (the files that you upload into iTunes connect so you could have it under your name in iTunes), I got my mojo back for it and Version 2 went much better. I thought of it in the new IOS 7 design and adapted what I'd done so far into a Xero inspired 'beautiful' user interface. The content was done so all I had to do was design around it, the fun job! So I toddled away at that for a while then saw they were releasing the binary code. Jumped on that bandwagon (several emails and tweets later as they were a bit slow responding) got my binary code.
I must say, it was a bit of a rigmarole trying to get iTunes connect to accept the binary code file - although AppArchitect supplied a lot of the info that you needed to change things in order to get to the App store. Actually, considering they were in Beta mode they were moderately helpful!
_________________________________________________________________________________
End Result: TA DA!
Well it happened! I will reveal all in this post. I paid next to nothing (although a lot in time), without in depth coding and all by myself. How? Well I will share with you my secrets!
Why?
Well why not!? I've always had a hankering to see if I could get an app to the app store, a bit of a personal challenge and a boasting point I suppose! "Why Yes, I do have an app in the app store and its not half bad :)."
What?
Since I had no skills coding and programming the amount of functions needed to be cut down. I quickly realized having a simple content based app was the way to go. With all my reading, many said to keep it simple as the user wasn't interested in trudging through all your 'cool' ideas and pages.
Having a look at my immediate whereabouts (Napier, New Zealand) I decided a info app on Art Deco and top things to do in Sunny Napier is a good start. I started 20 Buildings to write about/images. I soon cut this down to top 5 as it takes a LONG time to generate your own quality content. I added top 5 things to do in Napier and voila! I had a Top10 App.
How?
Elance? ODesk? TeaminIndia? Developer contacts? NO WAY (although I'd like to explore these options). I went down the DIY road. DYOR People!!! After a few stop starts, I settled on AppArchitect. It was basic as it was still in its beta phase. So I adapted my app to fit into what was available at the time on the web based platform builder. The first go at getting into the app store (Version 1) saw my half hearted effort get there... Yeah nah, didn't go well (a little embarrassed of it actually!) Also it was uploaded under the developer Applique - That's what AppArchitect was originally named. It had to be by default Free also.
After thinking - should I just leave it or spruce it up? After seeing they were going to release the actual binary code (the files that you upload into iTunes connect so you could have it under your name in iTunes), I got my mojo back for it and Version 2 went much better. I thought of it in the new IOS 7 design and adapted what I'd done so far into a Xero inspired 'beautiful' user interface. The content was done so all I had to do was design around it, the fun job! So I toddled away at that for a while then saw they were releasing the binary code. Jumped on that bandwagon (several emails and tweets later as they were a bit slow responding) got my binary code.
I must say, it was a bit of a rigmarole trying to get iTunes connect to accept the binary code file - although AppArchitect supplied a lot of the info that you needed to change things in order to get to the App store. Actually, considering they were in Beta mode they were moderately helpful!
_________________________________________________________________________________
End Result: TA DA!
Napier Top10 Traveller edition is here!


Subscribe to:
Posts (Atom)
